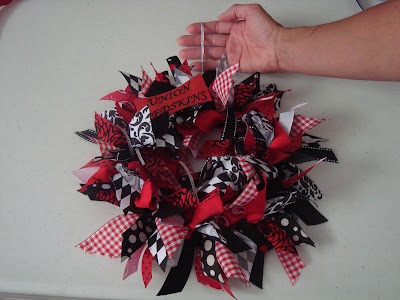
School Spirit Ribbon Wreath
Are you ready for school to start? Isn't it funny the responses you get when you ask that question? A week ago my kids would have said and big fat NO! Now that they have their school supplies and new clothes (or new to them), I think the butterflies have started flitting around in their stomachs and they might say Yes! I have to say, I am getting excited. All of the prep and schedule planning makes my head real, but I love the start of a new year, for them and for me.
I thought this would be a good time to share with you my School Spirit Ribbon Wreath.
I made several last Christmas for my fellow teacher assistants and teachers, and they were a big hit. Thanks to design etc. for the inspiration. I love this idea for teachers and students. Put it on your list for Back-To-School, Teacher Appreciation, Christmas, and more.
Wire wreath frame - 8" used here
Large variety of ribbons in various widths (11 different ribbons used here)
Extra-wide solid color ribbon or strip (4" strip used here) of solid fabric about 60" long
Cut your ribbons in 8" lengths. Either cut the ends at angles or use a candle to melt the ends to prevent fraying. I didn't melt the ends on this project because of the amount of ribbon used, but it would have made the finished wreath look better. I chose to repeat my pattern 7 times, so I cut 7 strips of each ribbon.
You may choose a pattern for your ribbons or simply begin attaching them without a set pattern. I'm a little too OCD for that, so I made sure to have my pattern set up in a little assembly line. I even alternated the colors and separated the pattern types. Don't laugh, I know I'm not the only one who does this.
Attach the ribbons with a simple overhand tie. They shouldn't need any more than that if you pull them tight. Alternate between the middle two rows of wire on the wreath in an off-set pattern. Also, alternate the direction you tie to make the ribbons overlap each other and look a little more "crazy." As you complete a section of the wreath form, you will see better how many ribbon strips you want in each section and can add more, if you wish.
When complete, trim the ends to the length needed to tuck them under one last time, using a dab of tacky glue on the end to secure it.
I added a longer strip of the silver ribbon at the top, outer wire for hanging.
Print out the name you want to attach. There are many options here. I printed it on heavy card stock. You can use paper and either mod podge or simply glue it to cardboard and cut it out. You could laminate it. Or, check your craft store for some of the millions of scrapbook options. Then simply use tacky glue to attach it to the ends of two ribbons where you want it placed.
Now fluff and hang it!
This post has been linked up to: Fabric Bows and More and Jam's Corner.


This is a cute idea! My sister just started college and this would be fun for her to have! I found your post from the 36th Avenue Linky Party, thanks for sharing!
ReplyDeleteSo cute- love the colors. I just posted a similar idea today :) They are so fun aren't they?!
ReplyDeleteThank you, yes they are!
Deleteyurtdışı kargo
ReplyDeleteresimli magnet
instagram takipçi satın al
yurtdışı kargo
sms onay
dijital kartvizit
dijital kartvizit
https://nobetci-eczane.org/
0TİHKY