Lace Brooches

 |
| Had to don a sweater today because of the cold front that came through. It only got to 93 degrees today, brrrr! |
Estimated cost for 3 brooches: $6.
My basic supplies: Thread to match your lace, or as closely as possible, standard sewing needle, large-eye sewing needle, scissors, and jewelry pliers.
My special supplies:
I purchased 2 types of lace at $2 or $3/yrd. The first is an ecru (although it doesn't show well in this picture). The second is ivory.

I also picked up these pretty decorative brads (was looking for buttons but liked these much better for the price), and jewelry findings (these are little locks and keys - adorable!). I found, in my box of trinkets, a cool little pearl bobble from my pregnancy days (it was used to cinch the back of maternity tops by clips at each end), I also had a scrap piece of chain, a few pin backings that are not shown here, and . . .
a scrap of ribbon.
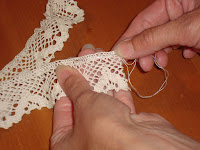
I began by cutting about 18" of the ecru lace. I then tied thread to the beginning of the lace in a secure knot and sewed a gathering stitch near the top edge.
After gathering it tightly, I tied another knot at the end of the lace.
Then, I sewed the ends together from top edge to bottom.
The brads needed to be adjusted in order to be sewn, so I folded the brads over crossing in front of each other. It is hard to see here, but it created a small double loop to sew onto the lace from the back.
Then I attached the pearl strand (shortened by 3 pearls to fit, and chain to each side of the brad, and the lock and key to the chain. I finished it with a pin backing.
Brooch 1
These are the supplies I used for Brooch 2. Making the second brooch was very similar. However, I added a ribbon to the lace.
To add the ribbon, I used the large-eye needle and threaded the lace through the large holes along the middle of the lace. After gathering the lace, I pulled the ribbon so it did not leave large ribbon loops around the lace. But, don't pull too tight because you want it to still have some movement.
I finished this brooch as the first with the brad. But, I used the 3 pearls I removed from the first strand. I threaded them and sewed them directly to the lace along with a piece of chain from the keys and locks chain, and a set of locks and keys at the end.
Brooch 2
For the last brooch, I used the ivory lace, a cameo brad, and silver lock and key. I didn't use the spare piece of chain shown, but instead a jump ring from the lock and key set. I made this brooch, again, as the first, but only added the key and lock on the large jump ring.
Brooch 3
This was such a fun project. I can't wait to wear the pieces and use them in other projects. I'd love to hear what you think and see what you make!
This post has been linked up with these AWEsome parties: Positively Splendid, Jam's Corner, Six Sisters' Stuff, Thrifty Decorating, Fabric Bows and More, Suzy's Artsy Craftsy Sitcom, Rustic Crafts and Chic Decor, Happy Go Lucky,The 36th Avenue, and AliLily.


So, so pretty! Love these. Your work is really beautiful! =)
ReplyDeleteKristina J.
These are lovely. You did an awesome job! Thanks so much for linking up to Marvelous Mondays! :)
ReplyDeleteJulie
Those are so sweet! Great idea. I've GOT to make some of those!
ReplyDeleteThanks. Send me a pic of what you make, would love to see them.
DeleteThese are just darling, and I want to make a couple. Did you sew or glue a pin-back to the back of your brooches?
ReplyDeleteOops, I didn't even realized I hadn't included this step! You could do either. I usually sew them for a little more security.
ReplyDeleteExcellent blog post but I was questioning if you could create a little extra on this topic? If you might elaborate a little bit further, I would certainly be really thankful. Appreciate it! Car repair services at affordable rates
ReplyDelete